
 This week on Facebook, I posted this picture of my progress on the Urban Renewal (Inner City) quilt top. I was overwhelmed by the positive comments and ‘likes’ it received. I also received quite a few inquiries about assembly.
I’d LOVE to see boatloads of quilts made with this pattern so I thought I would show a picture story of the steps I’m taking to make this top and the thought process behind my choices. It may not be the easiest or most efficient method but it is the one that works for me.
I wanted to use up many of the already cut fabric pieces I had left from assembling my Grandmother’s Flower Garden top. After making a queen size top, I used some of the leftover pieces to make a baby quilt top. Yes, I’m frugal! I STILL have pieces left! I took light, medium and dark hues of individual colors and trimmed the hexagrams to the trapezoid shapes I need for this new quilt. I also cut new paper pieces (1.5″ on each short side) from used printer paper for assembly in the English Paper Piecing technique.

1. In this first picture, you see the trapezoid papers set atop the fabric pieces. I add holes (with a holepunch) to the center of each paper to assist in removing the papers after assembling the top. Notice the fabric is cut 1/4″ all around larger than the papers. The fabric doesn’t need to be cut perfectly as the outside edges are turned under and basted around the paper. The papers should be precisely cut, each to the same size and shape.
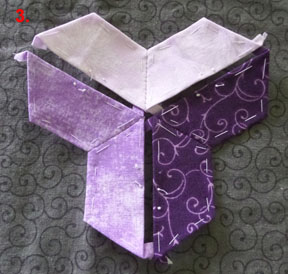
2. In this picture, you see basted pieces in three green hues. Each 2 matching pieces need to be stitched together as shown. To do this, I place the pieces atop each other, right sides together, and whip stitch together along one angled side to make a boomerang. These three boomerangs will make one ‘Y’ unit.
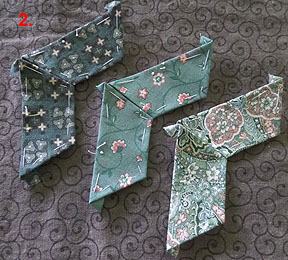
3. This top is not made in blocks, but in ‘Y’ units. Each unit is made with 3 boomerangs, whipstitched down each long side. Be certain to lay out each hue identically with the other units. On my top, I placed the lightest hue on the top, and the darkest on the right. This gives the 3 D effect to the top.
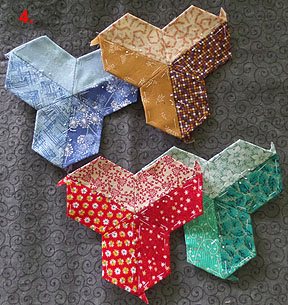
4. Make a bunch of ‘Y’ units, all with light, medium and dark hues. You’ll be amazed at just how many it takes to assemble a top. I became bored after making several dozen units so I would assemble them into diagonal rows, being careful to distribute my colors as I wanted them in the top and making certain the hues were positioned correctly.
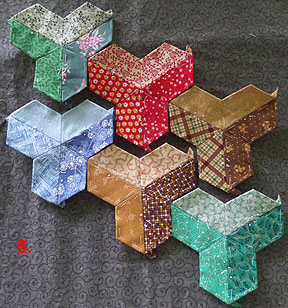
5. Though there’s not a great variety here, this is a sample of how to assemble diagonal rows. There is no need to snip the little ears from the units as they will swirl on the back without leaving a hard bump. I assemble enough of these diagonal rows to make the width of the quilt top. My top is currently 52″ wide before adding borders.
In the near future, I plan to add Kona black trapezoids and hexagrams to fill in the edges of the top. My thinking is it will provide the sought-after 3 D effect all the way to the borders. At this time, I have not decided if I will include a pieced or solid border or two. I will begin auditioning options soon.
Shirl
By Silvia Waites Sun Sep 14th 2014 at 4:32 pm
Love it. Hope it will print off!
By Penny Sanders Sun Sep 14th 2014 at 7:59 pm
I have loved this quilt from the first time I saw it…have printed this off and will be in my bucket list…I WILL MAKE THIS QUILT…I LOVE IT…Thank you for posting this informative description with pictures…got to help lol
By Sandy Adams Mon Sep 15th 2014 at 5:54 pm
Thank You for sharing this beautiful pattern. God Bless
By shirlsu Tue Sep 16th 2014 at 11:26 am
You’re welcome, Sandy. This one has been on my bucket list for several years. I don’t think we see many quilts of this design because it’s so labor-intensive. It’s definitely the most challenging pieced top I’ve made.
By Betty J. Johnson Tue Dec 23rd 2014 at 11:06 pm
I would’ve just traced around the template 6 times for each Y-block. I like to handpiece, not whip stitching though. It looks great!